RemoteViews
RemoteViews的应用
RemoteViews在通知栏上的应用
先创建自定义布局
利用RemoteViews将布局应用到notification中
1
2
3
4
5
6
7
8
9
10
11
12
13
14
15
16
17
18
19
20
21
22
23
24
25
26
27
28
29
30
31
32
33
34
35
36
37
38
39
40
41
// 获取通知管理器
val manager = getSystemService(Context.NOTIFICATION_SERVICE) as NotificationManager
//创建通道
val channelId = "default"
if (Build.VERSION.SDK_INT >= Build.VERSION_CODES.O) {
val channel = NotificationChannel(
channelId,
"默认通知", // 用户在设置里看到的渠道名称
NotificationManager.IMPORTANCE_DEFAULT
)
manager.createNotificationChannel(channel)
}
// 创建 RemoteViews (加载自定义布局)
// 第一个参数是包名,第二个参数是你的 layout 文件 ID
val remoteViews = RemoteViews(packageName, R.layout.layout_notification)
// 设置 RemoteViews 里的文本和图片
remoteViews.setTextViewText(R.id.msg, "chapter_5")
remoteViews.setImageViewResource(R.id.icon, R.drawable.avatar)
// 创建点击通知后跳转的 Intent
val intent = Intent(this, MainActivity2::class.java)
val pendingIntent = PendingIntent.getActivity(
this,
0,
intent,
PendingIntent.FLAG_UPDATE_CURRENT or PendingIntent.FLAG_IMMUTABLE
)
// 使用 Builder 构建通知对象
// 注意:Android 8.0+ 需要增加 ChannelId
val notification = NotificationCompat.Builder(this, channelId)
.setSmallIcon(R.mipmap.ic_launcher) // 设置图标
.setTicker("hello world") // 状态栏提示文字
.setWhen(System.currentTimeMillis()) // 设置时间
.setContentIntent(pendingIntent) // 设置点击意图
.setAutoCancel(true) // 点击后自动取消 (对应 FLAG_AUTO_CANCEL)
.setCustomContentView(remoteViews)//应用自定义布局
.build()
// 发送通知
manager.notify(1, notification)
RemoteViews在桌面小部件上的应用
**AppWidgetProvider本质:**是Android提供的用于实现桌面小部件的类,其本质是一个广播即BroadcastReceiver
开发桌面小部件典型过程:
定义小部件的界面:
1
2
3
4
5
6
7
8
9
10
11<LinearLayout xmlns:android="http://schemas.android.com/apk/res/android"
android:layout_width="match_parent"
android:layout_height="match_parent"
android:orientation="vertical">
<ImageView
android:id="@+id/imageView1"
android:layout_width="wrap_content"
android:layout_height="wrap_content"
android:src="@drawable/avatar"/>
</LinearLayout>定义小部件配置信息:(在res/xml里面创建)
1
2
3
4
5
6<appwidget-provider xmlns:android="http://schemas.android.com/apk/res/android"
android:initialLayout="@layout/widget"
android:minHeight="84dp"
android:minWidth="84dp"
android:updatePeriodMillis="86400000">
</appwidget-provider>定义小部件的实现类:
1
2
3
4
5
6
7
8
9
10
11
12
13
14
15
16
17
18
19
20
21
22
23
24
25
26
27
28
29
30
31
32
33
34
35
36
37
38
39
40
41
42
43
44
45
46
47
48
49
50
51
52
53
54
55
56
57
58
59
60
61
62
63
64
65
66
67
68
69
70
71
72
73
74
75
76
77
78
79
80
81
82
83
84
85
86
87
88
89
90
91
92
93
class MyAppWidgetProvider : AppWidgetProvider() {
companion object {
private const val TAG = "MyAppWidgetProvider"
const val CLICK_ACTION = "com.example.viewtest.CLICK"
}
override fun onReceive(context: Context, intent: Intent) {
super.onReceive(context, intent)
Log.i(TAG, "onReceive : action = ${intent.action}")
// 这里判断点击事件的 action
if (intent.action == CLICK_ACTION) {
Toast.makeText(context, "clicked it", Toast.LENGTH_SHORT).show()
// 启动线程执行动画效果(旋转图片)
thread {
val srcBitmap = BitmapFactory.decodeResource(context.resources, R.drawable.avatar)
val appWidgetManager = AppWidgetManager.getInstance(context)
for (i in 0 until 37) {
val degree = (i * 10 % 360).toFloat()
val remoteViews = RemoteViews(context.packageName, R.layout.widget)
// 设置旋转后的图片
remoteViews.setImageViewBitmap(
R.id.imageView1,
rotateBitmap(srcBitmap, degree)
)
// 重新绑定点击事件(每次更新 RemoteViews 都需要重新绑定)
val intentClick = Intent(CLICK_ACTION)
val pendingIntent = PendingIntent.getBroadcast(
context, 0, intentClick,
0
)
remoteViews.setOnClickPendingIntent(R.id.imageView1, pendingIntent)
// 更新小部件
appWidgetManager.updateAppWidget(
ComponentName(context, MyAppWidgetProvider::class.java),
remoteViews
)
SystemClock.sleep(30)
}
}
}
}
//每次小部件更新时都调用一次该方法
override fun onUpdate(context: Context, appWidgetManager: AppWidgetManager, appWidgetIds: IntArray) {
super.onUpdate(context, appWidgetManager, appWidgetIds)
Log.i(TAG, "onUpdate")
for (appWidgetId in appWidgetIds) {
onWidgetUpdate(context, appWidgetManager, appWidgetId)
}
}
/**
* 桌面小部件更新逻辑
*/
private fun onWidgetUpdate(context: Context, appWidgetManager: AppWidgetManager, appWidgetId: Int) {
Log.i(TAG, "appWidgetId = $appWidgetId")
val remoteViews = RemoteViews(context.packageName, R.layout.widget)
// “桌面小部件”单击事件发送的 Intent 广播
val intentClick = Intent().apply {
action = CLICK_ACTION
}
val pendingIntent = PendingIntent.getBroadcast(
context, 0, intentClick,
PendingIntent.FLAG_UPDATE_CURRENT or PendingIntent.FLAG_IMMUTABLE
)
remoteViews.setOnClickPendingIntent(R.id.imageView1, pendingIntent)
appWidgetManager.updateAppWidget(appWidgetId, remoteViews)
}
/**
* 旋转图片工具方法
*/
private fun rotateBitmap(srcBitmap: Bitmap, degree: Float): Bitmap {
val matrix = Matrix()
matrix.reset()
matrix.setRotate(degree)
return Bitmap.createBitmap(
srcBitmap, 0, 0,
srcBitmap.width, srcBitmap.height, matrix, true
)
}
}在AndroidManifest.xml中声明小部件:
1
2
3
4
5
6
7
8
9
10
11<receiver android:name=".MyAppWidgetProvider"
tools:ignore="IntentFilterExportedReceiver">
<meta-data
android:name="android.appwidget.provider"
android:resource="@xml/appwidget_provider_info">
</meta-data>
<intent-filter>
<action android:name="com.example.viewtest.CLICK"/>
<action android:name="android.appwidget.action.APPWIDGET_UPDATE"/>
</intent-filter>
</receiver>
AppWidgetProvider中各个方法调用时机
- **onEnable:**当该窗口小部件第一次添加到桌面上时调用该方法,可添加多次但只在第一次调用
- **onUpdate:**小部件被添加时或每次小部件更新时都会调用一次该方法,小部件的更新时机由updatePeriodMillis来指定,每个周期小部件都会自动更新一次
- **onDeleted:**每删除一次小部件就调用一次
- onDisabled:当最后一个该类型的小部件被删除时调用,注意是最后一个
- **onReceive:**这是广播的内置方法,用于分发具体的事件给其他方法
PendingIntent概述
和Intent区别
- PendingIntent一般用于跳到应用内部,常和NotificationManager配合使用, Intent一般跳转到指定的activity,service等
- pendingIntent的执行不是立刻的,延时的.而Intent是立刻执行的,所在的activity 消失而消失
- PendingIntent可以理解为Intent的封装包,简单的说就是在Intent上在加个指定的动作。在使用Intent的时候,我们还需要在执行startActivity、startService或sendBroadcast才能使Intent有用。而PendingIntent的话就是将这个动作包含在内了。
三种接口方法
getActivity(Contextcontext,int requestCode,Intent intent,int flags);效果相当于Context.startActivity(Intent)getService(Contextcontext,int requestCode,Intent intent,int flags); 效果相当于Context.startService(Intent)getBroadcast(Contextcontext,int requestCode,Intent intent,int flags);效果相当于Context.sendBroadcast(Intent)
参数说明
- requestCode一般为0即可
- requestCode会影响到flags的效果
PendingIntent的匹配规则
- 两个PendingIntent内部的intent相同并且requestCode也相同则这俩PendingIntent就相同
- Intent匹配规则:如果两个Intent的ComponentName和intent-filter都相同那么这俩Intent相同
flags参数
- flag_one_shot,同类的通知只能使用一次,后续的通知单机将无法打开
- flag_no_create ,当前描述的PendingIntent不会主动创建,如果其不存在那么调用getActivity这些方法返回值为null,这个标记位很少见,它无法单独会用,因此在日常开发中用的很少
- flag_cancel_current ,被cancel的消息单机后将无法打开
- flag_update_current,执行更新,他们的intent中的Extras会被替代成最新的
RemoteViews内部机制
RemoteViews的构造方法public RemoteViews(String packageName,int layoutId)
第一个表示当前应用的包名(反射机制需要),第二个表示加载的布局文件。
注:RemoteViews不能支持所有View类型。就像下表没有EditTextView,如果在布局文件中则会报错
它所支持的所有类型如下:r
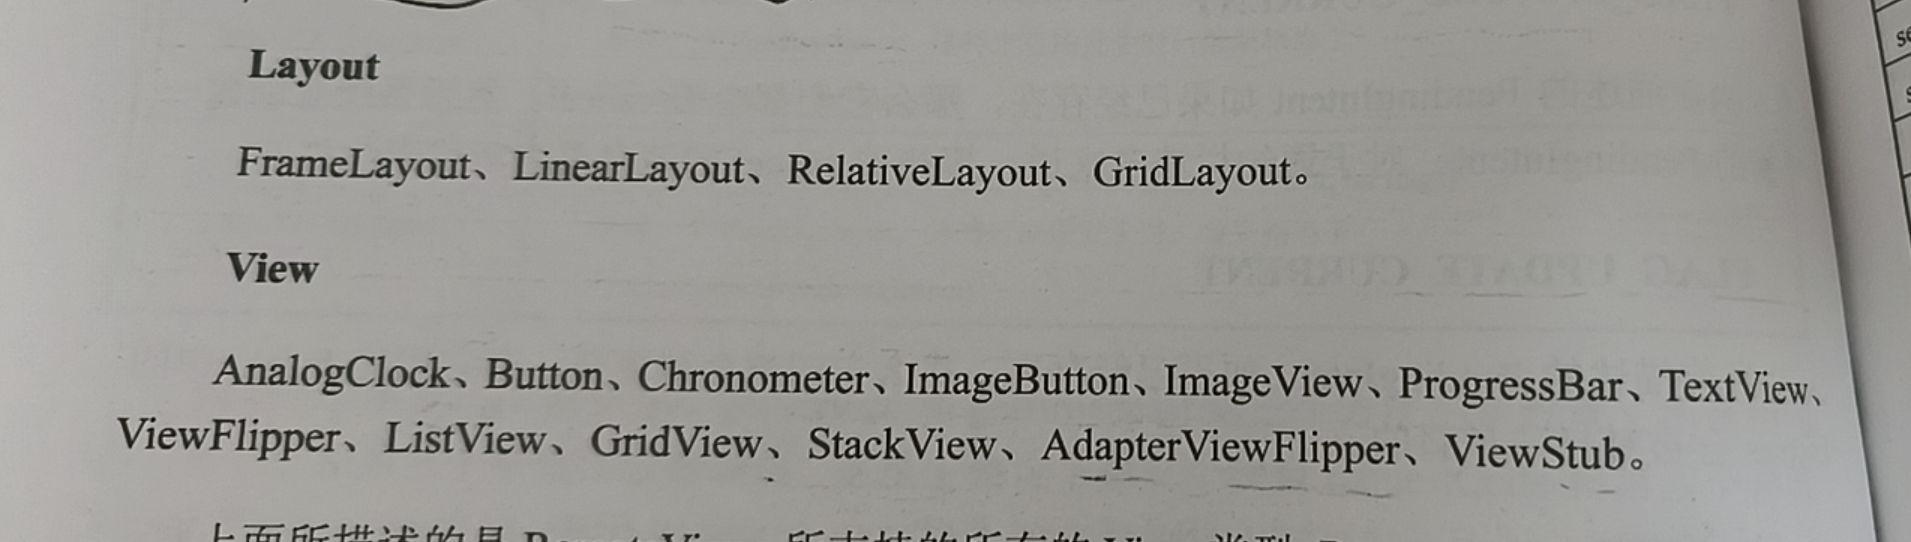
RemoteViews不支持除了以上View之外的任何View也不支持自定义View
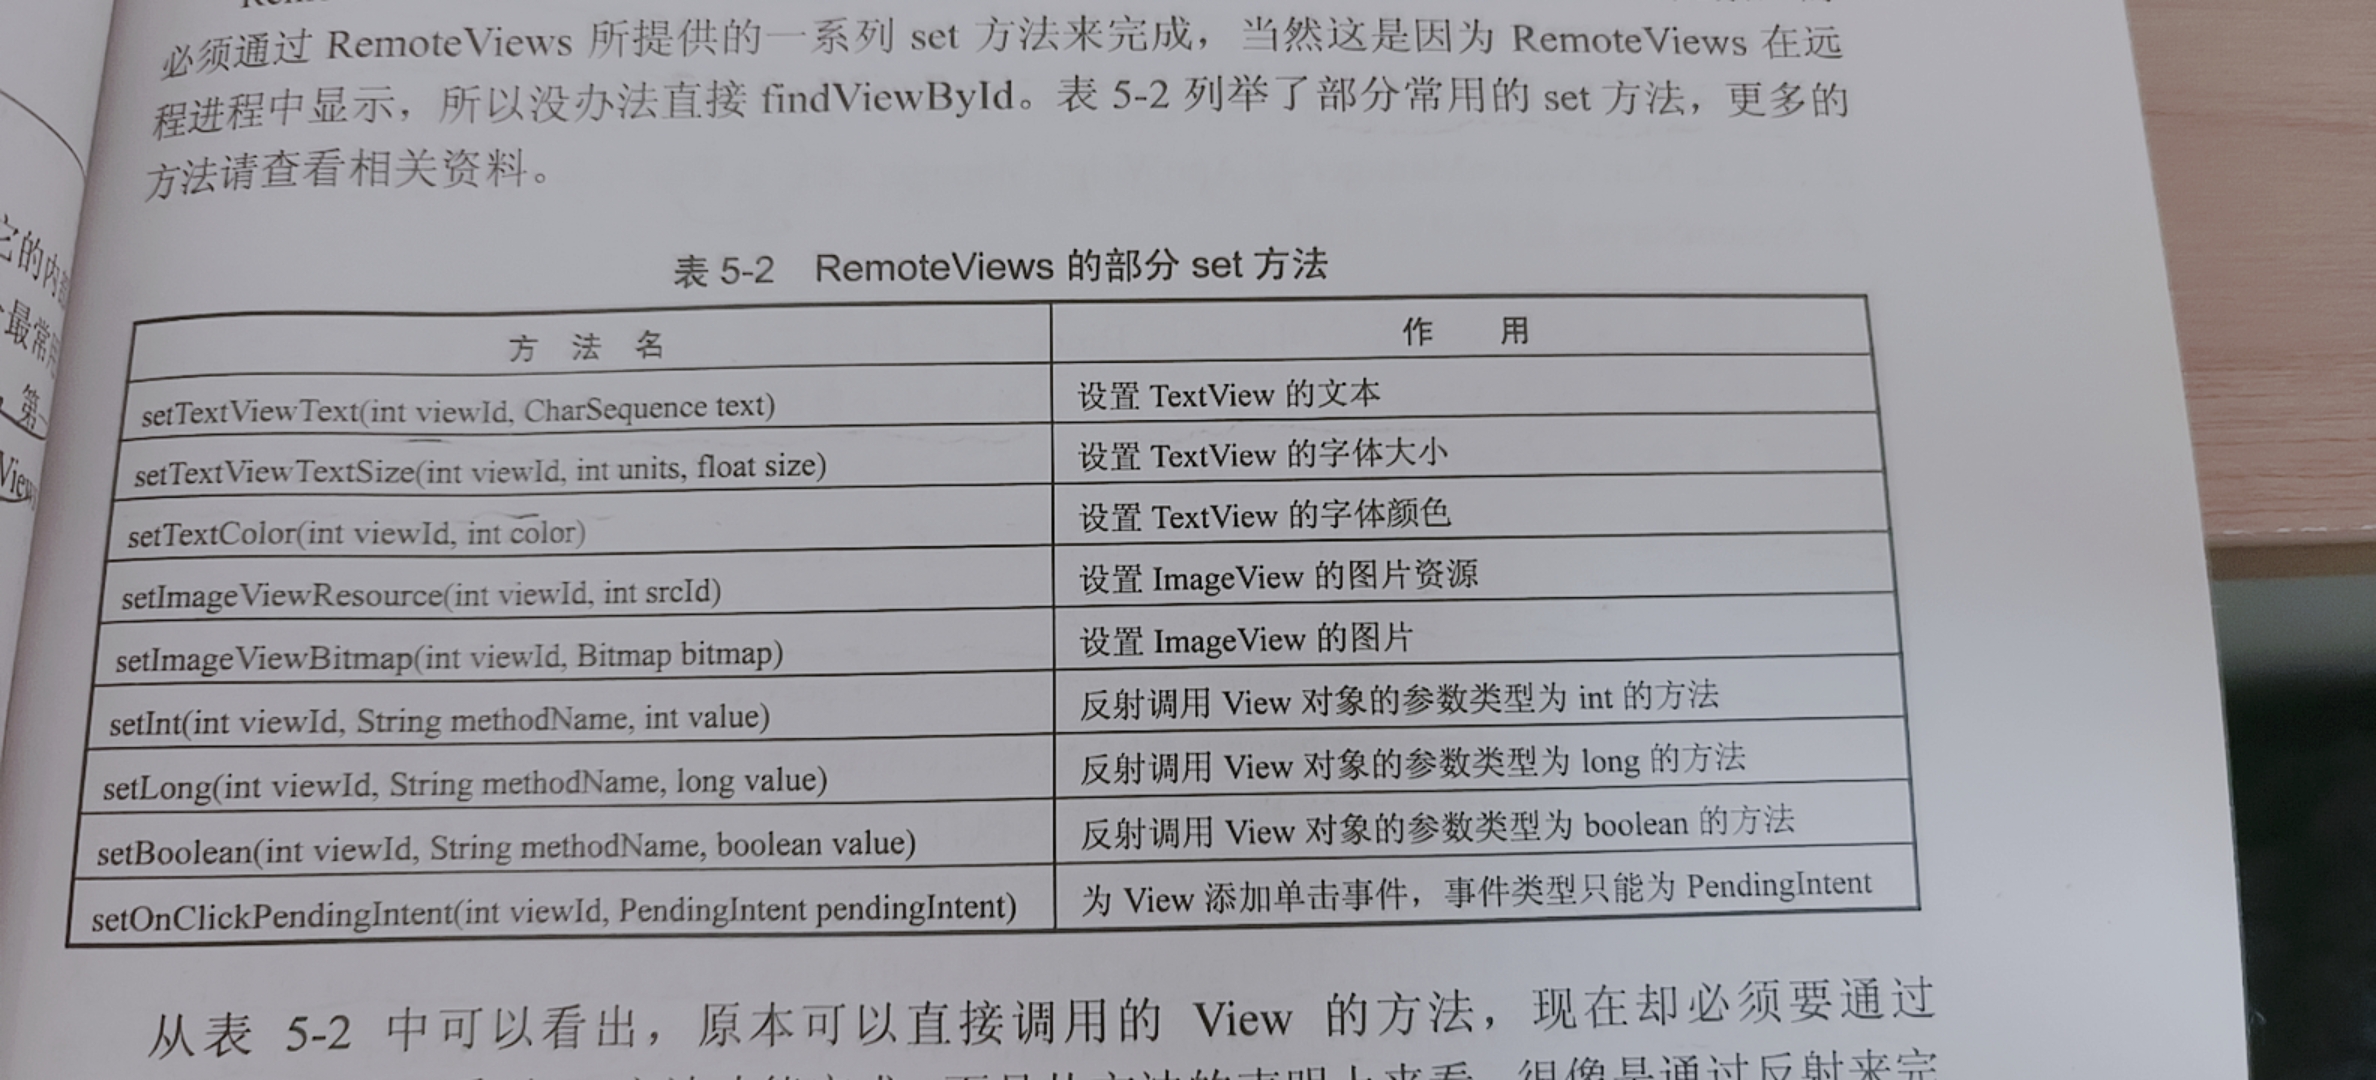
RemoteViews无法直接使用findViewById而是提供了一系列的set方法如下:
本博客所有文章除特别声明外,均采用 CC BY-NC-SA 4.0 许可协议。转载请注明来源 Auroraの世界!