Fragment使用方式
简单用法
1.新建碎片布局
2.新建碎片类继承Fragment并在碎片类中动态加载碎片布局
3.将碎片引入活动布局
1
2
3
4
5
6
7
8
9
10
11
12
|
<LinearLayout xmlns:android="http://schemas.android.com/apk/res/android"
android:orientation="vertical"
android:layout_width="match_parent"
android:layout_height="match_parent">
<Button
android:id="@+id/button"
android:layout_width="wrap_content"
android:layout_height="wrap_content"
android:layout_gravity="center_horizontal"
android:text="Button"/>
</LinearLayout>
|
1
2
3
4
5
6
7
8
9
| class LeftFragment: Fragment() {
override fun onCreateView(
inflater: LayoutInflater,
container: ViewGroup?,
savedInstanceState: Bundle?
): View? {
return inflater.inflate(R.layout.left_fragment,container,false)
}
}
|
1
2
3
4
5
6
7
8
9
10
11
12
13
|
<LinearLayout xmlns:android="http://schemas.android.com/apk/res/android"
android:orientation="vertical"
android:background="#00ff00"
android:layout_width="match_parent"
android:layout_height="match_parent">
<TextView
android:layout_width="wrap_content"
android:layout_height="wrap_content"
android:layout_gravity="center_horizontal"
android:textSize="24sp"
android:text="This is right fragment"/>
</LinearLayout>
|
1
2
3
4
5
6
7
8
9
| class RightFragment:Fragment() {
override fun onCreateView(
inflater: LayoutInflater,
container: ViewGroup?,
savedInstanceState: Bundle?
): View? {
return inflater.inflate(R.layout.right_fragment,container,false)
}
}
|
1
2
3
4
5
6
7
8
9
10
11
12
13
14
15
16
17
18
|
<LinearLayout xmlns:android="http://schemas.android.com/apk/res/android"
android:orientation="horizontal"
android:layout_width="match_parent"
android:layout_height="match_parent">
<fragment
android:id="@+id/leftFrag"
android:name="com.example.fragmenttest.LeftFragment"
android:layout_width="0dp"
android:layout_height="match_parent"
android:layout_weight="1"/>
<fragment
android:id="@+id/rightFrag"
android:name="com.example.fragmenttest.RightFragment"
android:layout_width="0dp"
android:layout_height="match_parent"
android:layout_weight="3"/>
</LinearLayout>
|
动态添加Fragment
- 创建待添加的实例
- 获取FragmentManager对象
- 开启一个事务使用beginTransaction()方法开启
- 向容器内添加或替换fragment
- 提交事务,用commit()完成
1
2
3
4
5
6
7
8
9
10
11
12
13
|
<LinearLayout xmlns:android="http://schemas.android.com/apk/res/android"
android:orientation="vertical"
android:background="#00ff00"
android:layout_width="match_parent"
android:layout_height="match_parent">
<TextView
android:layout_width="wrap_content"
android:layout_height="wrap_content"
android:layout_gravity="center_horizontal"
android:textSize="24sp"
android:text="This is another right fragment"/>
</LinearLayout>
|
1
2
3
4
5
6
7
8
9
10
|
class AnotherRightFragment:Fragment() {
override fun onCreateView(
inflater: LayoutInflater,
container: ViewGroup?,
savedInstanceState: Bundle?
): View? {
return inflater.inflate(R.layout.another_right_fragment,container,false)
}
}
|
1
2
3
4
5
6
7
8
9
10
11
12
13
14
15
16
17
18
19
20
|
<LinearLayout xmlns:android="http://schemas.android.com/apk/res/android"
android:layout_width="match_parent"
android:layout_height="match_parent"
android:orientation="horizontal"
>
<fragment
android:id="@+id/leftFrag"
android:name="com.example.fragmenttest.LeftFragment"
android:layout_width="match_parent"
android:layout_height="match_parent" />
<FrameLayout
android:id="@+id/rightLayout"
android:layout_width="0dp"
android:layout_height="match_parent"
android:layout_weight="1">
</FrameLayout>
</LinearLayout>
|
1
2
3
4
5
6
7
8
9
10
11
12
13
14
15
16
17
18
19
20
21
22
23
24
25
26
| class MainActivity : AppCompatActivity() {
private lateinit var binding: ActivityMainBinding
override fun onCreate(savedInstanceState: Bundle?) {
super.onCreate(savedInstanceState)
binding = ActivityMainBinding.inflate(layoutInflater)
setContentView(binding.root)
val button:Button=findViewById(R.id.button)
button.setOnClickListener {
replaceFragment(AnotherRightFragment())
}
replaceFragment(RightFragment())
}
private fun replaceFragment(fragment: Fragment) {
val fragmentManager = supportFragmentManager
val transaction = fragmentManager.beginTransaction()
transaction.replace(R.id.rightLayout,fragment)
transaction.addToBackStack(null)
transaction.commit()
}
}
|
Fragment和Activity交互
在活动中调用碎片:
1
| val fragment=supportFragmentManager.findFragmentById(R.id.leftFrag) as LeftFragment
|
在碎片中调用活动:
1
2
3
| if(activity!=null){
val mainActivity = activity as MainActivity
}
|
不同的碎片之间通信:
1.在一个碎片中得到与之关联的活动
2.然后在这个Activity中去获取另一个Fragment实例
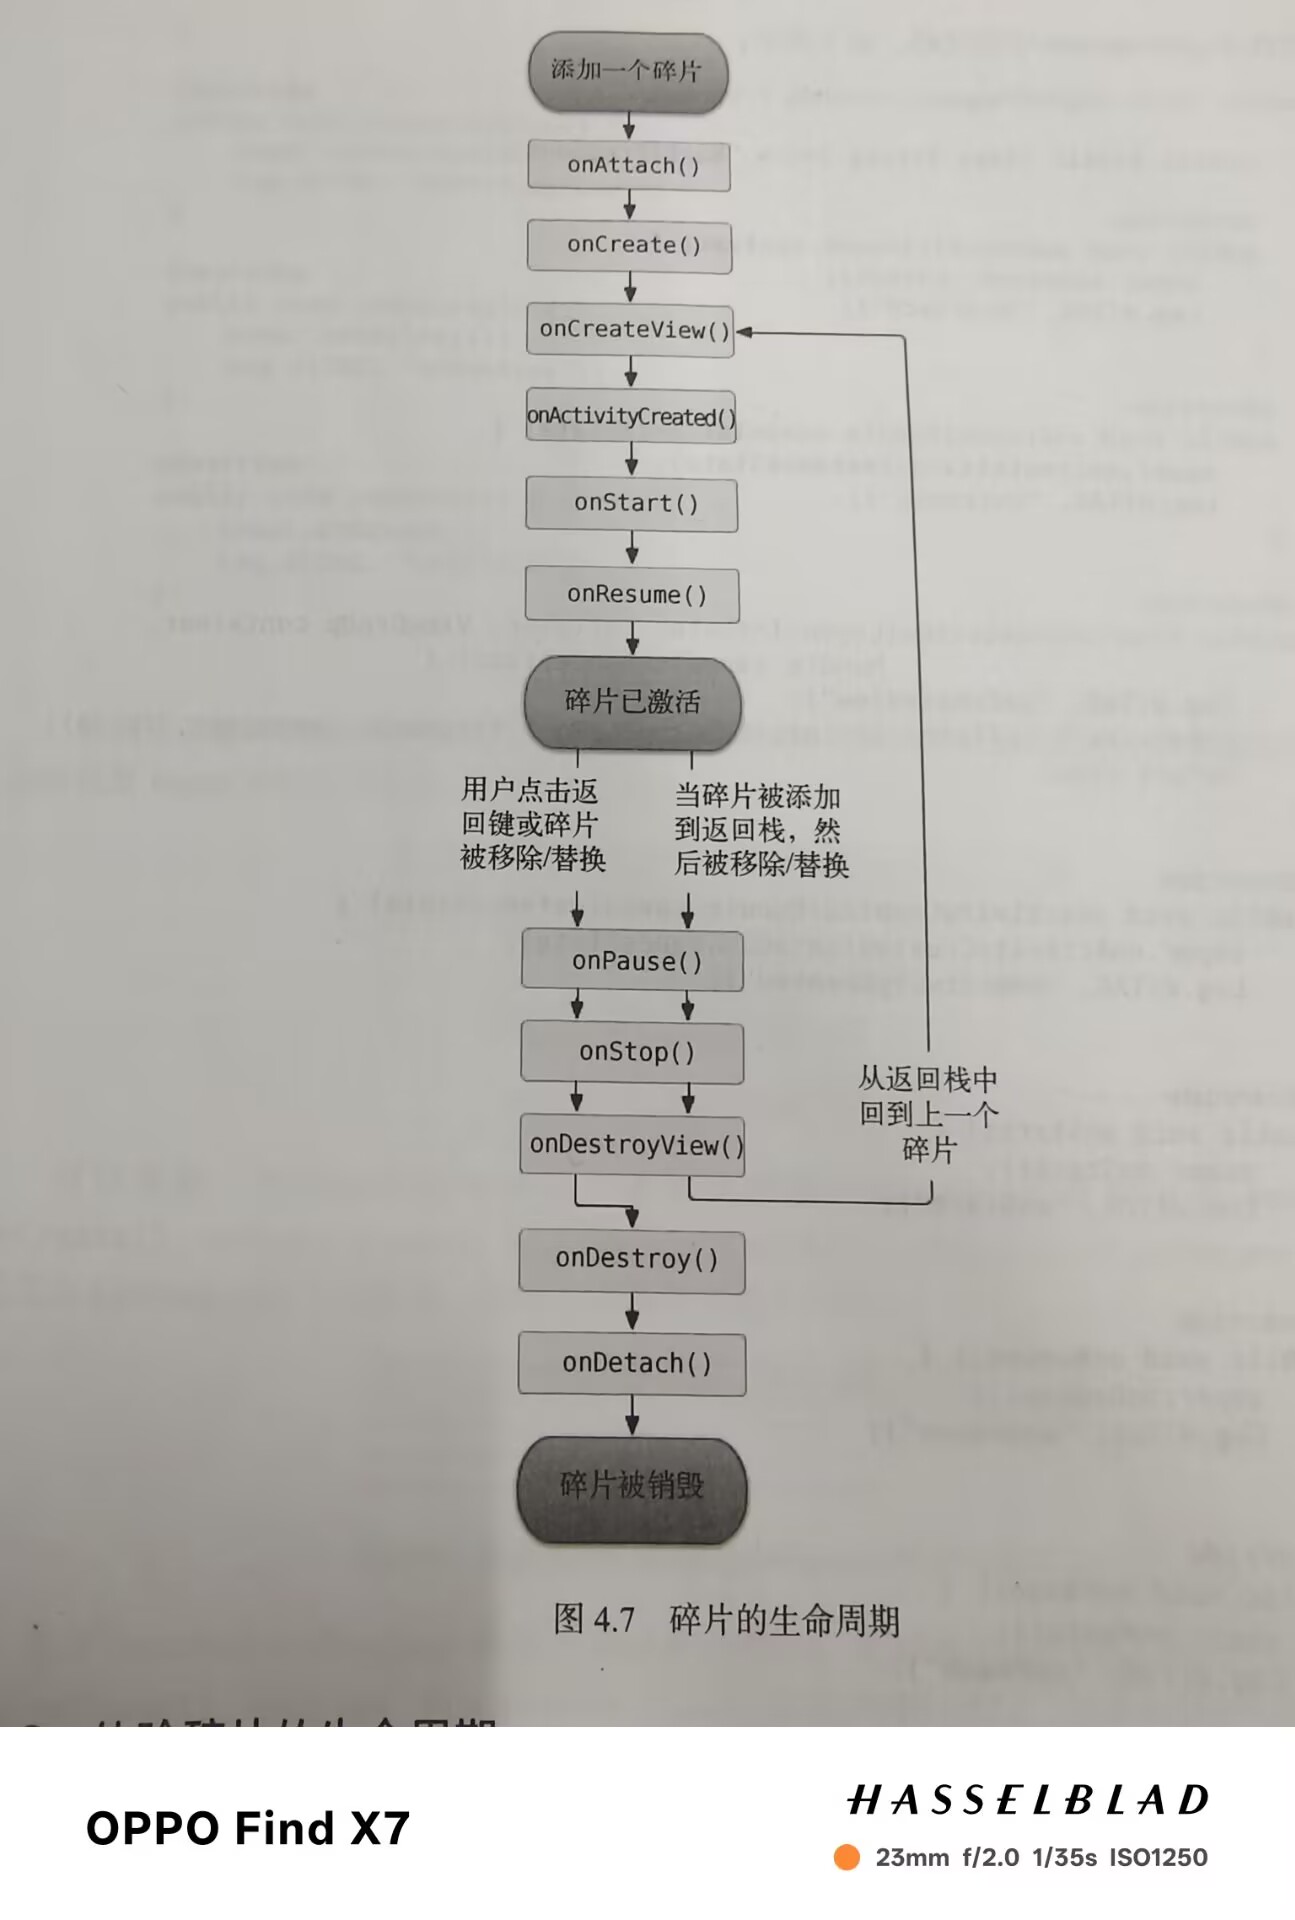
Fragment的生命周期
fragment的状态
(1)运行状态:
当一个碎片是可见的,并且它所关联的活动正处于运行状态时,该碎片也处于运行状态
(2)暂停状态:
当一个活动进入暂停状态时(由于另一个未占满屏幕的活动被添加到了栈顶),与它相关联的可见碎片就会进入到暂停状态。
(3)停止状态:
当一个活动进入到停止状态时,与它相关联的碎片就会进入到停止状态,或者通过调用FragmentTransaction的remove(),replace()方法将碎片从活动中移除,但如果在事务提交之前使用addToBackStack()方法,这时的碎片也会进入到停止状态。总的来说,进入到停止状态的碎片对用户来说完全不可见,有可能被系统回收。
(4)销毁状态:
碎片总是依附于活动而存在,因此当活动被销毁时,与它相关联的碎片就会进入到销毁状态。或者通过调用FragmentTransaction的remove(),replace()方法将碎片从活动中移除,但如果在事务提交之前没有使用addToBackStack()方法,这时碎片也会进入到销毁状态。
fragment的回调方法
onAttach().当碎片和活动建立起关联的时候调用
onCreateView().为碎片加载布局时调用
onActivityCreated().确保与碎片相关联的活动一定已经创建完毕时使用
onDestroyView().当与碎片相关联的视图被移除的时候调用
onDetach().当碎片和活动解除关联时调用
碎片的完整生命周期示意图:
体验生命周期
1
2
3
4
5
6
7
8
9
10
11
12
13
14
15
16
17
18
19
20
21
22
23
24
25
26
27
28
29
30
31
32
33
34
35
36
37
38
39
40
41
42
43
44
45
46
47
48
49
50
51
52
53
54
55
56
57
58
59
60
61
62
63
| class RightFragment:Fragment() {
companion object{
const val TAG="RightFragment"
}
override fun onAttach(context: Context) {
super.onAttach(context)
Log.d(TAG, "onAttach: ")
}
override fun onCreate(savedInstanceState: Bundle?) {
super.onCreate(savedInstanceState)
Log.d(TAG, "onCreate: ")
}
override fun onCreateView(
inflater: LayoutInflater,
container: ViewGroup?,
savedInstanceState: Bundle?
): View? {
Log.d(TAG, "onCreateView: ")
return inflater.inflate(R.layout.right_fragment,container,false)
}
override fun onActivityCreated(savedInstanceState: Bundle?) {
super.onActivityCreated(savedInstanceState)
Log.d(TAG, "onActivityCreated: ")
}
override fun onStart() {
super.onStart()
Log.d(TAG, "onStart: ")
}
override fun onResume() {
super.onResume()
Log.d(TAG, "onResume: ")
}
override fun onPause() {
super.onPause()
Log.d(TAG, "onPause: ")
}
override fun onStop() {
super.onStop()
Log.d(TAG, "onStop: ")
}
override fun onDestroyView() {
super.onDestroyView()
Log.d(TAG, "onDestroyView: ")
}
override fun onDestroy() {
super.onDestroy()
Log.d(TAG, "onDestroy: ")
}
override fun onDetach(){
super.onDetach()
Log.d(TAG, "onDetach: ")
}
}
|
限定符
使用限定符
常见的限定符:

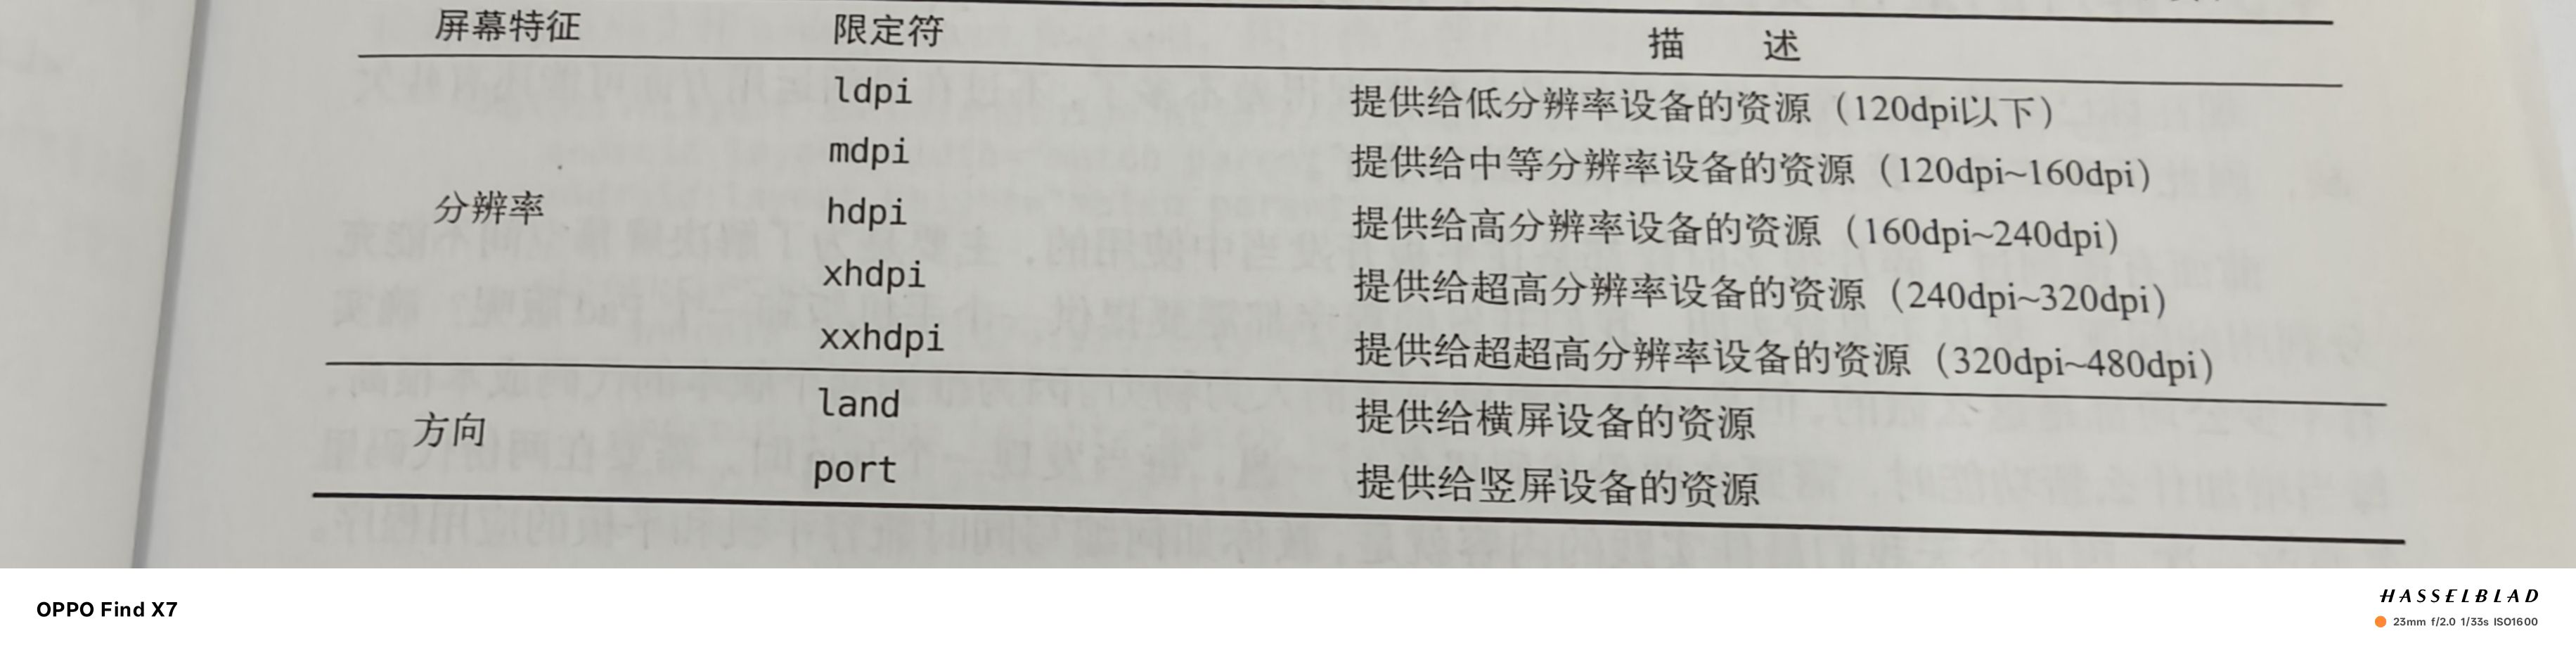
最小宽度限定符
**实例:**layout-sw600dp
**作用:**宽度大于等于600的会加载layout-sw600dp中布局,反之加载layout中布局