手机多媒体(Kotlin)
通知(进阶)
创建通知渠道
1
2
3
4
5
6
7
8
9
10
11
12
13
val manager=getSystemService(Context.NOTIFICATION_SERVICE) as NotificationManager
if(Build.VERSION.SDK_INT >= Build.VERSION_CODES.O){
/*参数介绍:
1.渠道id
2.渠道名称
3.重要等级
*/
val channel=NotificationChannel("normal","Normal",NotificationManager.IMPORTANCE_DEFAULT)
val channel2=NotificationChannel("important","Important",NotificationManager.IMPORTANCE_HIGH)
//创建通道
manager.createNotificationChannel(channel2)
manager.createNotificationChannel(channel)
}创建Notification对象
通过连缀设置丰富的Notification对象
1
2
3
4
5
6
7
8
9
10
11
12
val notification=NotificationCompat.Builder(this,"important")
.setContentTitle("Title")
.setContentText("Text")
.setSmallIcon(R.drawable.small_icon)
.setLargeIcon(BitmapFactory.decodeResource(resources,R.drawable.large_icon))
.setContentIntent(pi)//点击界面跳转
.setAutoCancel(true)//点击后图标自动消失
//富文本
.setStyle(NotificationCompat.BigTextStyle().bigText("Learn how to build notifications, send and sync data, and use voice actions. Get the official Android IDE and developer tools to build apps for Android."))
//显示图片
.setStyle(NotificationCompat.BigPictureStyle().bigPicture(BitmapFactory.decodeResource(resources,R.drawable.big_image)))
.build()显示通知
1
manager.notify(1,notification)
设置点击事件
1
2
3
val intent=Intent(this,NotificationActivity::class.java)
val pi=PendingIntent.getActivity(this,0,intent,0)
//在Notification对象中加入setContentIntent连缀
图标消失的两种方法:
1
2
3
4
//1.在Notification对象后加setAutoCancel连缀
//2.在界面跳转后的那个界面输入以下代码:
//val manager=getSystemService(Context.NOTIFICATION_SERVICE) as NotificationManager
//manager.cancel(1)“1”是指notify方法中传入的那个id
调用摄像头和相册
用摄像头拍照
首先创建一个File对象,用于存储拍下的照片
接下来通过判断版本进行操作,如果版本低于Android7.0就调用Uri的**fromFile()**方法转换为Uri对象(这个标识着图片的本地真实路径),如果版本高于7.0就调用FileProvider的getUriForFile()方法,将File转换成一个封装过的Uri对象
构建Intent对象,启动相机程序(利用startActivityForResult进行启动)
重写onActivityResult方法
判断图片方向,如果需要旋转并进行旋转
由于用到ContentProvider,故需要注册
1
2
3
4
5
6
7
8
9
10
<provider
android:authorities="com.example.cameraalbumtest.fileprovider"
android:name="androidx.core.content.FileProvider"
android:exported="false"
android:grantUriPermissions="true"
>
<meta-data
android:name="android.support.FILE_PROVIDER_PATHS"
android:resource="@xml/file_paths"/>
</provider>指定共享路径
1
2
3
4
5
6
<?xml version="1.0" encoding="utf-8"?>
<paths xmlns:android="http://schemas.android.com/apk/res/android">
<external-path
name="my_images"
path="/"/>
</paths>
从相册中选择
- 构建一个Intent对象表示打开文件选择器,并设置条件过滤
- 结果返回到onActivityResult中,调用getBitmapFromUri方法将Uri转换成Bitmap对象
- 将图片显示出来
1 | class MainActivity : AppCompatActivity() { |
播放多媒体
播放音频
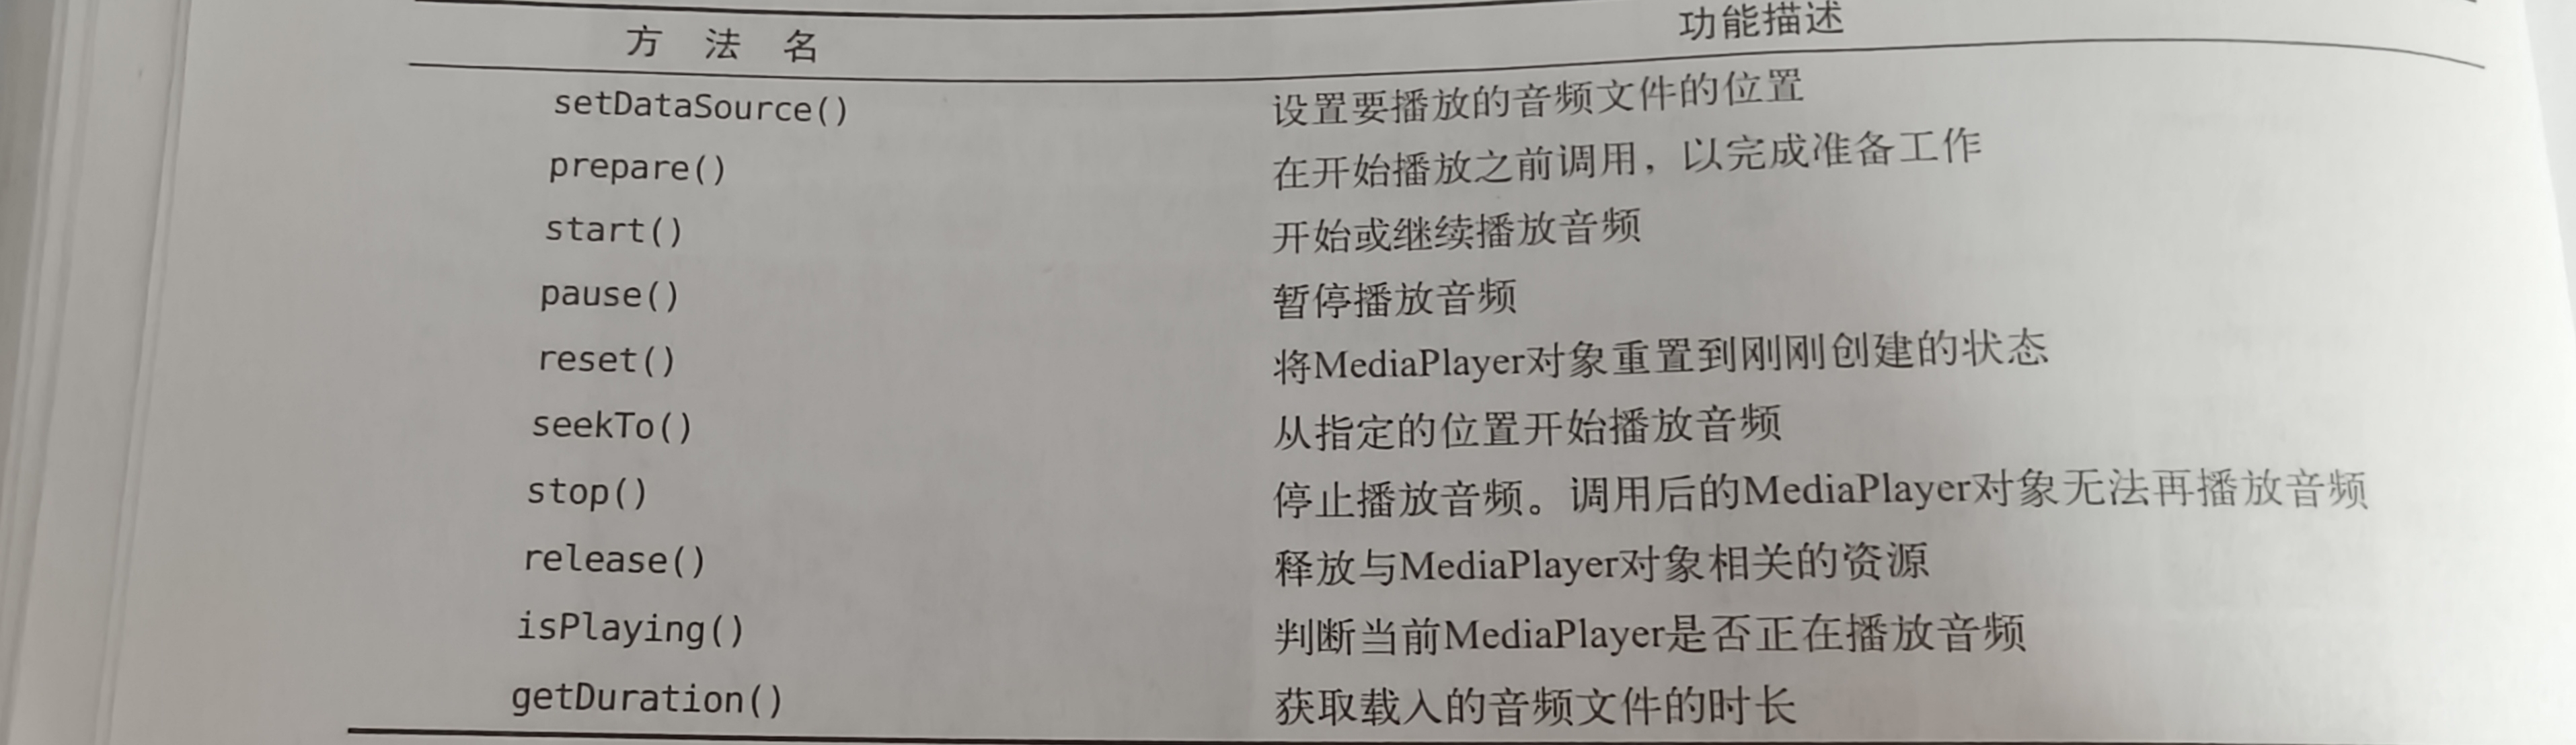
MdeiaPlayer类常用方法
过程
首先在main文件夹下创建一个assets文件夹,在里面放入要播放的音频
创建一个MediaPlayer对象
初始化MdeiaPlayer对象
利用MediaPlayer中的方法对音频文件状态进行判断并执行相应的操作
1
2
3
4
5
6
7
8
9
10
11
12
13
14
15
16
17
18
19
20
21
22
23
24
25
26
27
28
29
30
31
32
33
34
35
36
37
38
39
40
41
42
43
44
45
46
47
48
49
class MainActivity : AppCompatActivity() {
private lateinit var binding:ActivityMainBinding
//创建对象
private val mediaPlayer=MediaPlayer()
override fun onCreate(savedInstanceState: Bundle?) {
super.onCreate(savedInstanceState)
enableEdgeToEdge()
binding=ActivityMainBinding.inflate(layoutInflater)
setContentView(binding.root)
ViewCompat.setOnApplyWindowInsetsListener(findViewById(R.id.main)) { v, insets ->
val systemBars = insets.getInsets(WindowInsetsCompat.Type.systemBars())
v.setPadding(systemBars.left, systemBars.top, systemBars.right, systemBars.bottom)
insets
}
//初始化
initMediaPlayer()
binding.play.setOnClickListener {
if(!mediaPlayer.isPlaying){
mediaPlayer.start()//开始播放
}
}
binding.pause.setOnClickListener {
if(mediaPlayer.isPlaying){
mediaPlayer.pause()//暂停播放
}
}
binding.stop.setOnClickListener {
if(mediaPlayer.isPlaying){
//停止播放
mediaPlayer.reset()
initMediaPlayer()
}
}
}
private fun initMediaPlayer() {
//得到AssetManager实例,读取assets目录下任何资源
val assetManager=assets
//将音频文件句柄打开
val fd=assetManager.openFd("music.mp3")
//为音频做好播放前准备
mediaPlayer.setDataSource(fd.fileDescriptor,fd.startOffset,fd.length)
mediaPlayer.prepare()
}
override fun onDestroy() {
super.onDestroy()
mediaPlayer.stop()
mediaPlayer.release()
}
}
播放视频
VideoView常用方法

过程
利用VideoView控件显示视频
在res文件夹下新建raw文件夹放置视频文件
利用VideoView中的方法对音频文件状态进行判断并执行相应的操作
1
2
3
4
5
6
7
8
9
10
11
12
13
14
15
16
17
18
19
20
21
22
23
24
25
26
27
28
29
30
31
32
33
34
35
<LinearLayout xmlns:android="http://schemas.android.com/apk/res/android"
xmlns:app="http://schemas.android.com/apk/res-auto"
xmlns:tools="http://schemas.android.com/tools"
android:id="@+id/main"
android:layout_width="match_parent"
android:layout_height="match_parent"
tools:context=".MainActivity"
android:orientation="vertical">
<LinearLayout
android:layout_width="match_parent"
android:layout_height="wrap_content">
<Button
android:id="@+id/play"
android:layout_width="0dp"
android:layout_height="wrap_content"
android:layout_weight="1"
android:text="Play"/>
<Button
android:id="@+id/pause"
android:layout_width="0dp"
android:layout_height="wrap_content"
android:layout_weight="1"
android:text="Pause"/>
<Button
android:id="@+id/replay"
android:layout_width="0dp"
android:layout_height="wrap_content"
android:layout_weight="1"
android:text="Replay"/>
</LinearLayout>
<VideoView
android:id="@+id/videoView"
android:layout_width="match_parent"
android:layout_height="wrap_content"/>
</LinearLayout>1
2
3
4
5
6
7
8
9
10
11
12
13
14
15
16
17
18
19
20
21
22
23
24
25
26
27
28
29
30
31
32
33
34
35
36class MainActivity : AppCompatActivity() {
private lateinit var binding:ActivityMainBinding
override fun onCreate(savedInstanceState: Bundle?) {
super.onCreate(savedInstanceState)
enableEdgeToEdge()
binding=ActivityMainBinding.inflate(layoutInflater)
setContentView(binding.root)
ViewCompat.setOnApplyWindowInsetsListener(findViewById(R.id.main)) { v, insets ->
val systemBars = insets.getInsets(WindowInsetsCompat.Type.systemBars())
v.setPadding(systemBars.left, systemBars.top, systemBars.right, systemBars.bottom)
insets
}
val uri=Uri.parse("android.resource://$packageName/${R.raw.video}")
binding.videoView.setVideoURI(uri)
binding.play.setOnClickListener {
if(!binding.videoView.isPlaying){
binding.videoView.start()
}
}
binding.pause.setOnClickListener {
if(binding.videoView.isPlaying){
binding.videoView.pause()
}
}
binding.replay.setOnClickListener {
if(binding.videoView.isPlaying){
binding.videoView.resume()
}
}
}
override fun onDestroy() {
super.onDestroy()
binding.videoView.suspend()
}
}
本博客所有文章除特别声明外,均采用 CC BY-NC-SA 4.0 许可协议。转载请注明来源 Auroraの世界!